Caroline's corset tips
Here is the info I send out with my corset patterns:
Putting together your corset
1. Print out the sheets on A4 paper ensuring that the ‘actual size’ box is clicked in your print settings. You will need Adobe reader to read the .pdf document. Download this here: http://get.adobe.com/uk/reader/
2. Check the scale – it should measure 10cm (100mm) on the printed paper. If it does not, you will have to adjust the printer settings.
3. Tape the sheets together at the rectangular box line A to B, C to D and so on according to the print layout sheet.
4. First make up your toile to check the fit! This is particularly important as you will have purchased the pattern based on your largest measurement (e.g. hip) so it will need to be adjusted to fit at your smaller measurement (e.g under-bust).
5. Choose how much waist ‘cinch’ you would like – 2’’, 3’’ or 4’’? Follow that cutting line very carefully – see how there is only a tiny difference – over 8 panels it adds up!
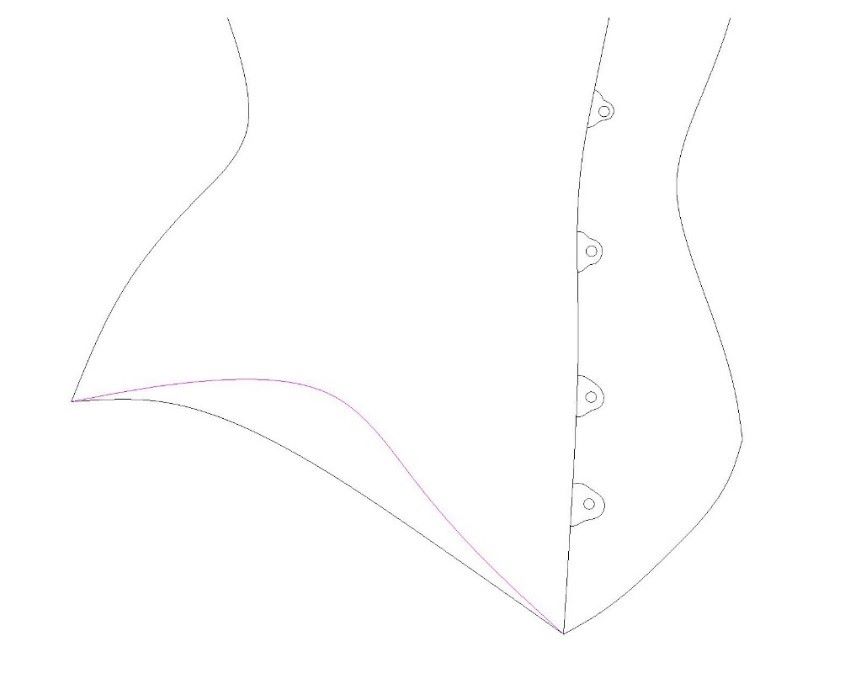
6. Choose your bottom and top curve – this pattern includes a few options depending on your preference.
7. Cut out the paper pattern pieces on the line - I use freezer paper – iron this on to the wrong side of your fabric, pencil around the pattern pieces and add the seam allowance, marking the notches and waistline within the seams.
8. Cut your fabric just as carefully! Remember to add a seam. I normally add about 15mm then you have ample fabric to adjust the fit. Note the panel number and L(eft) or (R)ight in the seam. Cut the fabric on the grain-line – the central line in each pattern piece marks the position of the grain-line of your fabric. If you don’t your corset will twist on your body – this is very important.
9. Make the corset using your favourite construction method. Here is my technique for single layer corsets;
- Single layer corsets can be adjusted relatively easily, however it is important to make up a toile first using this patterning process as you will have purchased a size that fits well at your largest measurement with a view to amending the pattern at this mock- up stage. It is far easier to pin and tuck a toile that is too big. Add the changes to your master pattern pieces before moving on to the corset fabric.
- Insert the busk to panel 1. Remember that the studs go on the side of the corset that will be YOUR LEFT. As you are working on the corset with the correct side of the fabric facing up, this be on your right.
- Decide whether you want your boning channels on the inside or outside of your corset. I usually put boning channels on the outside of a single layer corset – you must always stitch on the right side of the corset and you will get a much more professional finish this way. If you put your boning channels on the inside you will have to carefully baste the boning tape or bias binding and then follow the sewing lines closely from the other side. It can be done, but it’s not easy to get that perfect line of stitching on the boning channels working blindly from the other side! Note – if you are adding boning to the outside – stitch your panel with the WRONG sides together (and cover the seams on the right side with the boning channels), if you are adding boning channels to the inside – stitch your panels with the RIGHT sides together (and cover the seams on the wrong side with the boning channels).
- Join all the panels – start at THE WAISTLINE matching the lines or notches.
- I usually always add a second layer to panels 1 and 8 – it adds sturdiness, and lines of stitching can create the boning channels between the 2 layers.
- Check the two corset sides for symmetry. Trim the top and bottom if necessary.
- Mark and cut small holes for the eyelets and add your eyelets to panel 8. I use a prym eyelet setter. I set them 2cm apart usually.
- Add boning channels to alternate seams (after first double stitching these seams with a smaller (1.5) stitch – you can make up strips of binding (does not need to be cut on the bias) or buy special boning tape (looks OK only on the inside!).
- Cut and tip your bones. I use rigid steels at each side of the eyelets and spire wires elsewhere.
- Insert the bones to the alternate boning channels, lace up and try on.
- There may be minor adjustments you need to do at this stage – take in or let out at the unboned seams. The middles panels are better suited for adjusting at this stage.
- Double stitch with a smaller stitch (1.5) and add the remaining boning channels and bones.
- Stitch along the bottom and top about 2mm from the edge.
Tips:
I mix up my tasks, so, for instance, I don’t cut all my pieces out in one go and then sew them in one go. I’ll cut out pieces 1 and 2, then sew them, then 3 & 4 etc. I find it less likely to get the pieces mixed up this way. Working on both sides at the same time seems to help with the symmetry too – your eye sews a line and then seems to remember the curve and replicate the same stitching line on the other side.
Compare both corset sides as you go along. It’s so easy to make one side bigger than the other unless you check your work constantly. Always line up your corset waistline first and check all panels are horizontal against it – and the fabric grain-line is perpendicular to it.
Use freezer paper to draft your patterns. Iron this plastic backed paper directly on to your fabric (wrong side) – draw around the edge with a very sharp pencil or pen, then add your seam allowance. Chalk has its place, but not in corsetry – you can’t get a fine enough line. If you follow the inside of the drawn line when stitching your panels together you will be bang on to the millimetre. In corsetry it’s all about exactness in fit and symmetry of the two sides – following this process will aid this process.
Having difficulty inserting your steels into their boning channels? Steam press the fabric – the heat will make the fabric more malleable and expand ever so slightly allowing you to put those babies to bed.
Fitting a self-made corset
Commercial patterns are drafted to standard sizes – average proportions taken from populations that do not change significantly over time. Most people do not fit these proportions exactly and a certain amount of adjustment is necessary, more so for a close-fitting garment such as a corset where fit is also paramount for comfort.
Corset patterns from an independent corset maker will measure exactly as stated, so do maintain accuracy when marking and cutting to ensure your corset is made to the size stated. It is also imperative to take accurate body measurements (vertical as well as horizontal) before starting your project – preferably not after eating or at times when the body is bloated.
Corset logistics – effect on the body
A corset is usually designed to apply negative ease/ compression at the waist only and fit snugly elsewhere with no compression. A 1’’-2” compression will have only a very slight cinching effect that will give a gentle squeeze of the flesh (fat and muscle) that will not have much effect elsewhere on the body. A 3’’ squeeze will start to shift the skin and flesh in an upwards or downwards direction, and tighter lacing will start to have an effect on the internal organs – shifting them into different positions in much the same way as pregnancy.
Testing different amounts of waist cinch is a good way to understand the effect on you or your models’ particular body type, and how much can be tolerated. Flesh will have a tendency to move either up or down depending on the person and the corset design. It is important to understand this as the corset size and shaping can then be modified to accommodate this dynamic. This is the reason why toiles (sometimes numerous) are so useful – without making a toile first it is impossible to know how a corset will fit, feel, and change a person’s body.
Anatomy

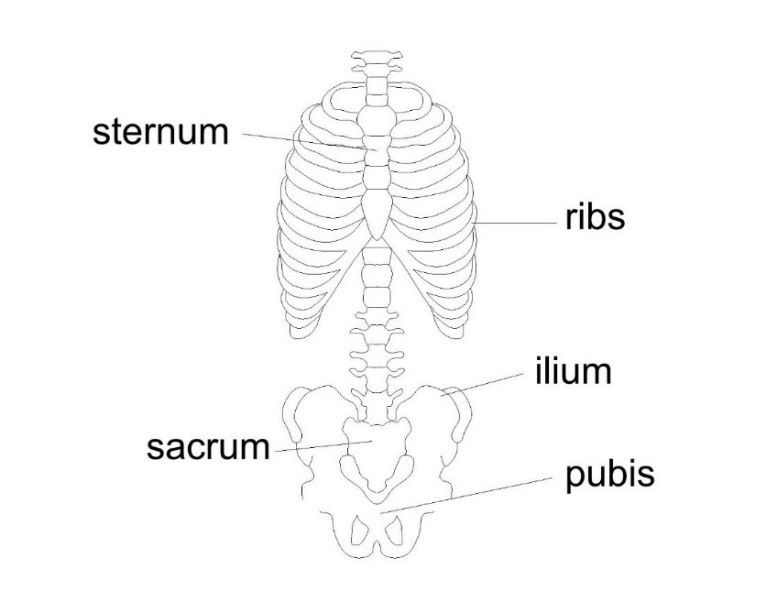
The ribs partially enclose and protect the chest cavity, where many vital organs (including the heart and the lungs) are located. The rib cage is collectively made up of long, curved individual bones with joint-connections to the spinal vertebrae. At the chest, many rib bones connect to the sternum via costal cartilage, segments of hyaline cartilage that allow the rib cage to expand during respiration. Although fixed into place, these ribs do allow for some outward movement, and this helps stabilize the chest during inhalation and exhalation. The human rib cage is made up of 12 paired rib bones; each are symmetrically paired on a right and left side. Of all 24 ribs, the first seven pairs are often labelled as 'true.' These bones are connected to the costal cartilage, while the five other 'false' sets are not. Three of those connect to non-costal cartilage, and two are deemed to be 'floating,' which means they only connect to the spine. While there are some cases of minor anatomical variation, men and women generally have the same amount of ribs. A differing rib count between the genders is largely a medical myth.
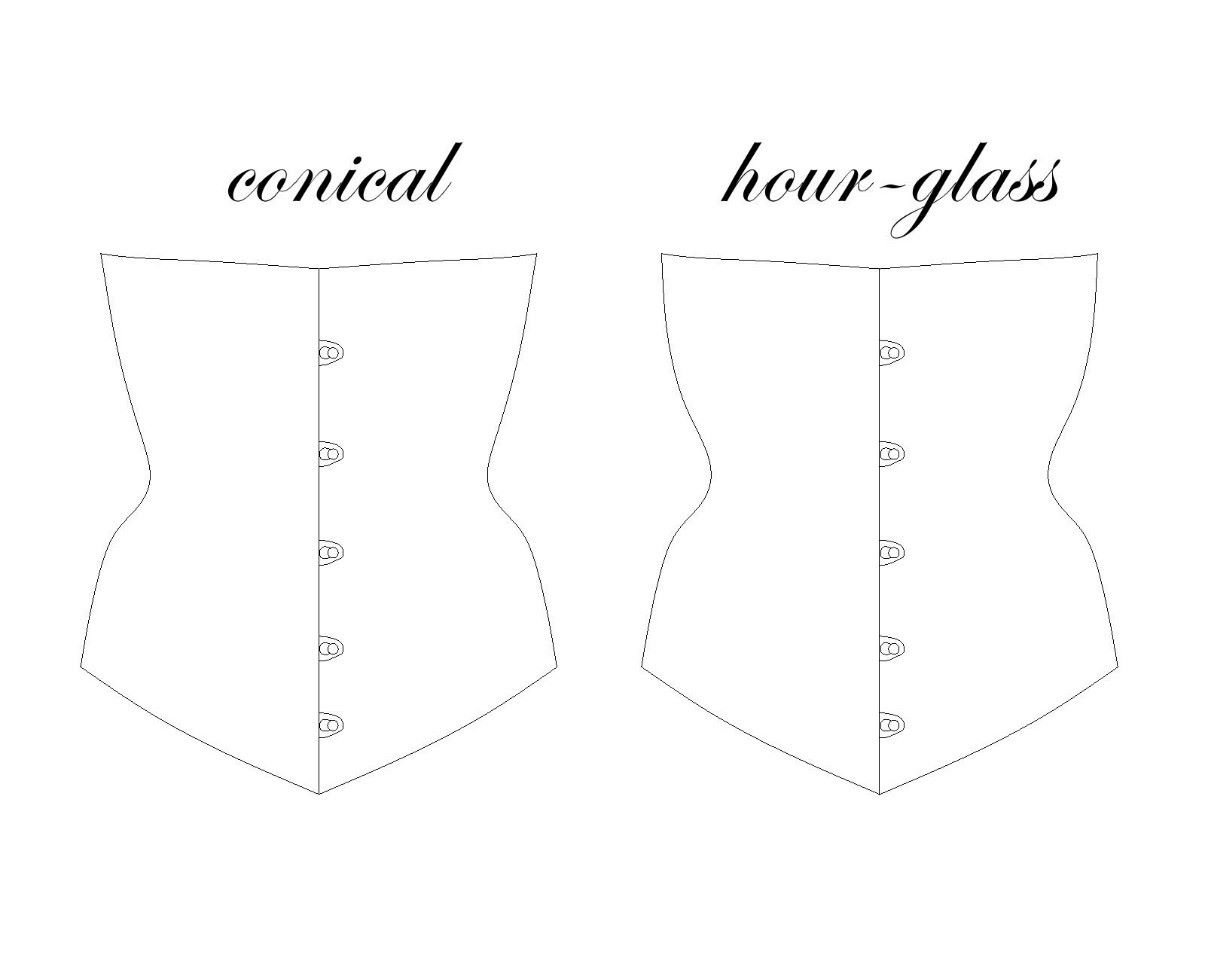
The ribs are therefore designed to move - and some people’s ribs move more than others. It is worth having a squeeze of your models’ ribs (if they will let you!) to see how much they compress. If there is some play, it is likely that a more conical shaping can be tolerated in your corset design. If they do not budge much at-all, any compression on the ribs could be uncomfortable and more of an hour-glass shaping might be preferred. An hour-glass shaping cups around the ribs more;

Another area of importance is the spacing between the bottom of the rib cage and the ilium crest (top of the hip bone). In some people this is very narrow and is termed ‘short-waisted’. In these cases it may help to shape the curve into the waist area more dramatically in order not compress the skeleton.
When making under-busts also be aware that the top of the corset should rest against the sternum rather than digging into the fleshy part of the abdomen underneath the sternum.
Consequences of a poor fit
- Discomfort
- Pinching/ digging in (e.g. shoulder blades)
- Skin irritations
- Shallow breathing
- Nerve pinching
- Corset asymmetry – the busk may not lay vertical and skews to one side
- The flat steel bones at the centre back will twist/kink in their channels with the narrow sharp edge then digging into the spine region
- Gaping
- Aesthetics – the corset will not look good
- Overspill of flesh at the top/bottom of the corset
- Non-parallel lacing gap – a parallel lacing gap is an indicator of a good fit. If the gap is wider at the top, /, add ease to the panels above the waist. If the gap is wider at the bottom, / , add ease to the panels below the waist. If the gap is wider at the waist ( ), add ease to the waist area.
Conversely, if you prefer a curvier shaping that the pattern is giving you – take away ease from the mid panels.
There may be a slight gape at the waist area initially as you break your corset in. If you intend to waist train, your waist will also reduce slightly and the gap will reduce over time. This is acceptable as long as the centre back bones are not twisting in their channels.
Troubleshooting fit issues
If your required size is not too dissimilar to the standard pattern size, you can pick the closest size and make minor adjustments to the toile. Nip and tuck areas that are gaping, or slash and spread areas where it is too tight. Have scraps of fabric handy to pin onto the spaces you have slashed and spread. Use a marker on the fabric if need be and then transfer all your changes on to new pattern pieces; place your changed fabric panel pieces (take apart your first toile) on to new paper and draw around the amended panels. The new panels may not true exactly with their neighbouring panel so you may need to ‘walk’ the seamlines together and then true up one of the panels to match.
Note: any amendment made to a pattern can have an effect elsewhere – if you take out the under-bust under the arms for instance, it may have an effect on the bust – the bust area may not sit against the sternum. The process is very much about trial and error- concentrate on the main area of concern initially, get this right and then move on to any issues that may arise from your modifications. Take notes and keep patterns and toiles so you can track your progress – it is easy to confuse things when making numerous changes.
Corsets by Caroline patterns have a number of variable size options (tops and tails that are joined at the waist) that are useful to achieve a closer fit for those sizes that vary by a few inches at the bust, under-bust and hips, but if your required size is very different to the standard pattern size you can adjust the pattern before embarking on your first toile. This is a little more involved and a few drafting rules need to be applied;
- It is tempting to divide the extra cm required (if you need to enlarge) equally by the number of panels, however this can have a detrimental effect to the shaping and is not recommended.
- If you have picked a waist size that corresponds with the cinched waist measurement you require and need to add to the under-bust or hip, use the mid panels to do this initially. If you need to add more then move to the mid back panels.
- If you or your client has protruding ribs, the seamlines at the centre front panels can be shaped outwards a little from the waist to under-bust.
- Try not to taper the panels so that they are smaller at the under-bust than at the waist. If you or your model are apple shaped and the under-bust is smaller than the waist, try amending the panels so they are initially straight from waist to under-bust, compressing the waist more than you think can be tolerated before adding ease for comfort. You might be surprised at the extent of compression (*do not, however proceed, if the waist gapes at the lacing gap or the fit is uncomfortable*).
- The more cinch is applied, the more the flesh will shift and will have to be accommodated elsewhere. At the toile stage consider where the flesh has migrated to, and whether you need to add ease to accommodate this migrated flesh; at the under-bust or hip for example.
- You may need to lengthen a corset to accommodate migrated flesh – a mother’s apron may shift downwards for instance, and the design will benefit from a longer corset at the front. A spoon busk may help contain tummy’s that have migrated downwards. Be mindful of the corset’s length for sitting however – you may have to curve the bottom of the corset from the centre front to the side so that the wearer can comfortably sit;

- If there is flesh over-spill this can be minimised by lengthening the corset to contain the flesh. Alternatively, the seamlines of the panels in the area of over-spill can be angled outwards slightly – a straight seam may be contributing to the flesh being squeezed upwards rather than contained;
- If there is too much pressure on the ribs or iliac crest consider hour-glass rather than conical shaping.
- If your under-bust is riding up and digging into the bust, reduce the corsets’ vertical length – either trim the top edge or take length from just above the waistline.
10. Bust fitting is a whole information sheet on its own and is not tackled here (at the moment!).
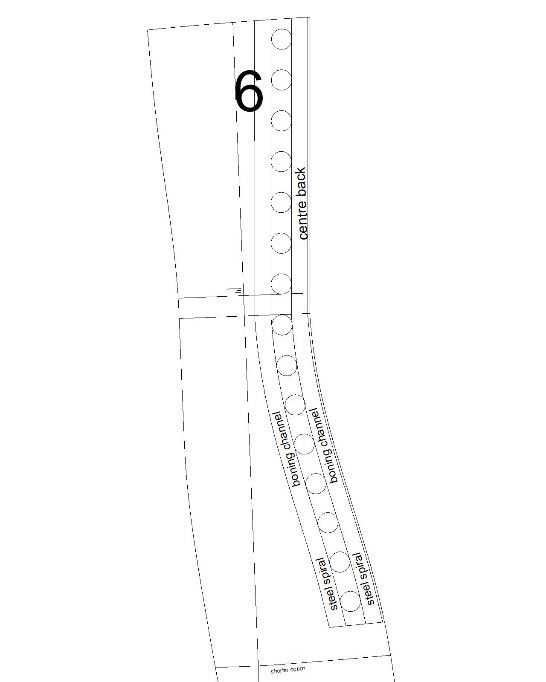
11. If you or your model has a pronounced lumbar curve (lordosis), the centre back panel can curve – it does not have to be straight. Curve the centre back inwards towards the waist from the top, and outwards from the waist to bottom. If you are using flat steels these can be manually bent to follow the curved boning channels but make sure the bend is gradual and not acute to avoid sharp edges that could dig into the spine. Example:

Getting the fit and comfort of a corset correct is the biggest challenge to new makers and can be very frustrating! It takes a bit of time to master and good results are rarely seen immediately – test and record your findings, don’t be afraid to experiment, and give yourself time to learn this wonderful craft. A corset does not, and should not, be uncomfortable!